We have so many blogs that will help us to know more about the 4-way handshake, In this post we will learn about the PTK generation and MIC generation of the 4-way handshake and we will learn about how to generate the keys , and verify the MIC in M2, M3 and M4.
Multiple keys will be generated in 4-way handshake, and different keys are used for different purposes.
Both the client and AP know the passphrase, And they don’t exchange the passphrase during handshake. Both the AP and client will get negotiated on the keys to be used.
Observe the below figure to know about the key hierarchy.
1) Passphrase is known to both AP and supplicant.
2) PSK Gets generated from the Passphrase from the following function. We need passphrase and SSID to generate the PSK.
PSK = pbkdf2.pbkdf2(str.encode(passphrase), str.encode(SSID), 4096, 32)
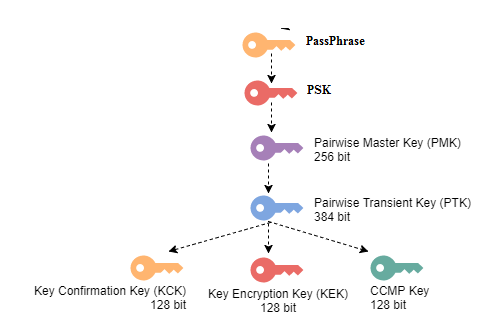
3) PMK gets generated from the below function. PBKDF2 (Password-based Key Derivation Funtion 2) which uses HMAC-SHA1 to encode the data.
If an 802.1X EAP exchange was carried out, the PMK is derived from the EAP parameters provided by the authentication server.
PMK = PBKDF2(HMAC−SHA1, PSK, SSID, 4096, 256)
The 4096 iterations to create 256 bit PMK with SSID used as salt and PSK used as the base of entire process.
4) PTK can be generated with a function (customPRF512) and this function expects few values to be passed as a arguments to regenerate the PTK which is the length of 384-bit, and additional 128-bit only for TKIP Configurations. We can generate the PTK easily from the python script, we will see about that later in the post.
PTK = PRF (PMK + Anonce + SNonce + Mac (AA)+ Mac (SA))
5) PTK Consists of multiple keys they are
- KEK – Used to encrypt the keys [Ex: GTK will be encrypted in M3 using KEK to deliver to the client].
- KCK – Used during the creation of the MIC, Hash will be generated using KCK.
- TK – Encryption and decryption of unicast packets.
- MIC Tx – Only used with TKIP configurations for unicast packets sent by access points.
- MIC Rx – Only used with TKIP configurations for unicast packets sent by clients.
Below are the contents of the PTK and the length of the keys.

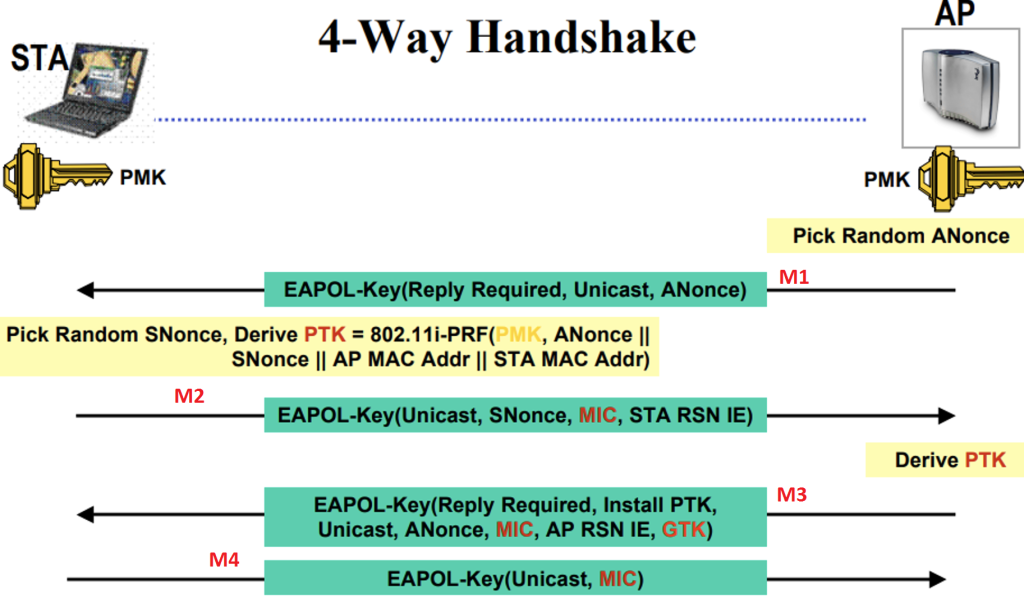
Now Observe the below figure that shows the 4-way handshake procedure.
Now check the Below sniffer capture of 4-way handshake, I have filtered only the required packets.

Key Generation
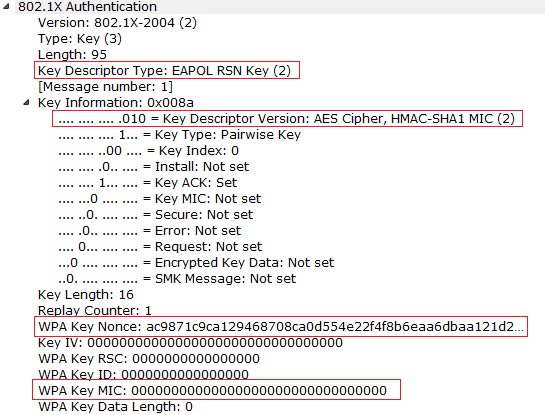
Lets open the EAPOL Message 1 and observe the Anonce that is sent by the AP.
1) M1 Message: Here AP will send the Nonce and we call it as ANONCE. And the 4-way handshake uses HMAC-SHA1 procedure to generate the MIC. For PMF the MIC key will be generated using AES CMAC , so the key generation algorithm used for PMF and WPA2+PSK will be different.
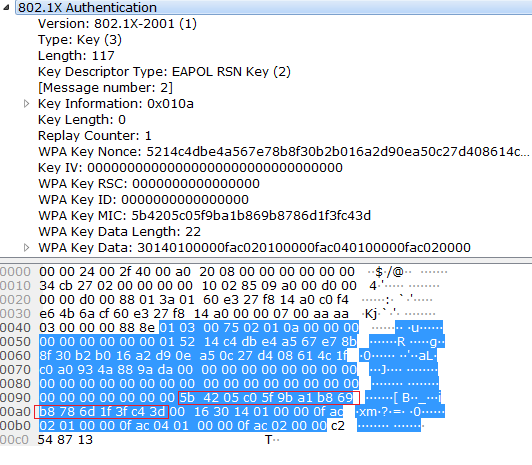
2) M2 Message: See the below M2 Message will be sent by the Supplicant and observe the contents of the M2 Message in the below sniffer. Supplicant will send the snonce, and now we have the required components to generate the PTK.
Required values. to generate the PTK are :
- Snonce
- Anonce
- PMK
- Source MAC Address
- Destination MAC Address
Now observe the below M2 Message. Here MIC Verification will be done, and MIC bit is set to 1.

Now We have the required values to generate the PTK. And now we should have the KCK which will be derived from the PTK and KCK will be used to generate the MIC. First we will generate the PTK and then we will check how to generate the MIC. We need to give all the input to the python program and we can see the PTK generated.
Observe the below image to see the output of the script that has generated the required keys. Now we are giving the input to the script that is going to generate the keys. We enter the below input.
- SSID
- Passphrase (WiFi Password)
- AP MAC
- Client MAC
- Anonce (We got from the M1 Message, Observe the M1 Message sniffer capture above)
- Snonce (We got it from M2 Message, Observe the M2 Message sniffer capture above)

Observe the below image to check the generated Keys.
In a pre-shared-key network, the PMK is actually the PSK. So, observe that in the above figure generated PSK and PMK are same.
Now we have the PTK and the value is (Observe the above Figure 3)
fb18560e63909f84f31d39da03a5d82fdc78c3b56f1870544308b84dee2144b87615729c4884a545d392c20b3f697025633245fc5a0fa15efeb0c82501f3a7b4
We will get the remaining keys from the PTK. PTK is divided in to the mutiple keys. Observe the below figure.
Keys
So, KCK is 1st 128 bits of the PTK i.e
KCK: fb18560e63909f84f31d39da03a5d82f
KEK, is 2nd 128 bits of the PTK i.e
KEK: dc78c3b56f1870544308b84dee2144b8
TK
TK : 7615729c4884a545d392c20b3f697025
MIC Tx
MIC Tx: 633245fc5a0fa15e
MIC Rx
MIC Rx: feb0c82501f3a7b4
MIC Verification
Now we will generate the MIC for the M2 data, and we will have to verify that the generated MIC matches with the value that we see in the sniffer.
Now we have to get the the M2 data from the sniffer capture. Observe the below capture and get the hex data from the wireshark. Below capture we can see the M2 802.1x Authentication data. Data is selected below (Blue Color).
And the 16 Byte MIC is selected in Red Color.
Now WPA2 PSK uses HMAC-SHA1 to generate the MIC and it uses the KCK as a secret to generate the MIC. Observe the below screen capture that generated the MIC, I have used openssl command line to generate the MIC.
In the below command I have replaced the MIC value to 16 byte Zero, and we use the key as KCK to generate the MIC. Observe that we are using the KCK as a key in the below figure. Execute the openssl command in any linux terminal.

M2 MIC Generation
echo -n ‘0103007502010a000000000000000000015214c4dbe4a567e78b8f30b2b016a2d90ea50c27d408614c1fc0a0000000000000000000000000000000000000000000000000000000000000000000000000001630140100000fac020100000fac040100000fac020000’ | xxd -r -macopt hexkey:fb18560e63909f84f31d39da03a5d82f
(stdin)= 5b4205c05f9ba1b869b8786d1f3fc43da056320a
Observe that generated sha-1 hash for the data is 20 bytes. And we take only the 16 bytes from the hash so we do not consider the last 4 bytes of the data. so the actual MIC that we saw in the Sniffer is given below. So we do not consider the last 4 Bytes from the generated sha-1 hash.

With MIC Verification 2/4 Messages are completed. If user enters the wrong passphrase then there will be a MIC failure and we don’t see the messages after the Message 2. See the below sniffer capture to check this behavior when the user enters the wrong key.

In the M3 Message , AP notifies the Supplicant to install the Keys and AP will send the GTK to the Supplicant, and the GTK will be encrypted using KEK. GTK could be a random number and it will be sent to the supplicant by encrypting it with KEK.
Observe the below capture to see the M3 Message.

Now see the MIC Generation for the M3 Message , it is similar to the one we saw in creating the M2 Message. But we have to get the data of the M3 message and then use the KCK as the secret key to generate the hash. Execute the below openssl command in any linux terminal.
M3 MIC generation:
echo -n ‘020300c70213ca00100000000000000002ac9871c9ca129468708ca0d554e22f4f8b6eaa6dbaa121d2233bf33cbc29d346000000000000000000000000000000000000000000000000000000000000000000000000000000000000000000000000006814ca01f8d15d931b12c98e973fd6b090abb7dc7277fe31823a2e8a19553946cf6236256850a4428244b990fddcabee637536a199b747b7e1f9eaa0e29878988cade1cbd6214cc6ef1a33dcce40539ba9909da2c891aecba97698bd8e3acd85f4002f581c4240009c’ | xxd -r -p | openssl dgst -sha1 -mac HMAC -macopt hexkey:fb18560e63909f84f31d39da03a5d82f
(stdin)= 9687171611e49a4611c13e0f3c6ac79b56c707e8
Observe that Sha-1 hash for the M3 data and i.e 20 Bytes and we consider only the 16 bytes for MIC verification, and observe the MIC in the above sniffer capture and it matches.
M4 MIC Generation
With the M4 Message the 4-way handshake procedure is completed. Observe the below capture to check the MIC verification for M4 and this procedure is similar to the one we saw for M2 and M3. See the below capture to check the MIC for M4 Message.
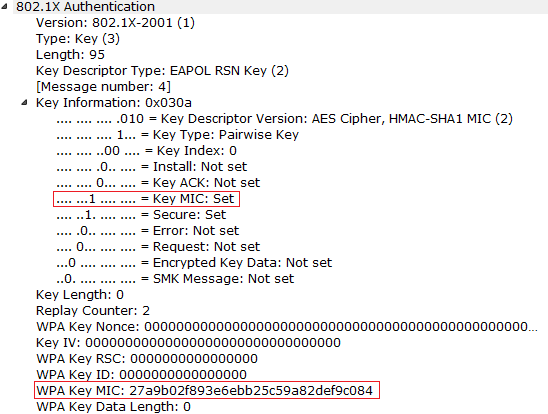
M4 MIC Generation
echo -n ‘0103005f02030a0000000000000000000200000000000000000000000000000000000000000000000000000000000000000000000000000000000000000000000000000000000000000000000000000000000000000000000000000000000000000000’ | xxd -r -p | openssl dgst -sha1 -mac HMAC -macopt hexkey:fb18560e63909f84f31d39da03a5d82f
(stdin)= 27a9b02f893e6ebb25c59a82def9c084c0a7169e
Observe the MIC generated and the MIC that we have observed in the sniffer. And we have to consider only the 16 bytes of generated Hash for the MIC . And after this all the unicast traffic will be encrypted using the TK that was generated during the 4-way handshake. Encrypted DHCP procedure will happen and after that data transfer will happen.
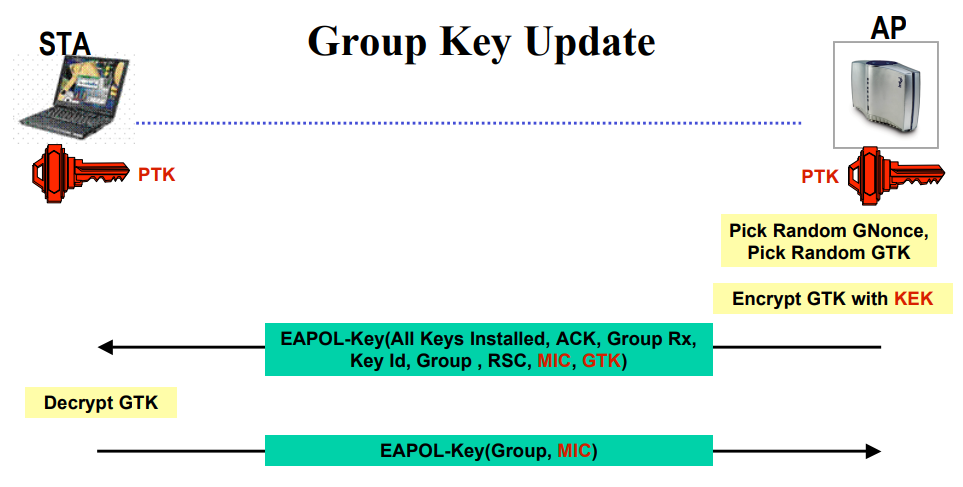
2-Way Handshake (Group Key Update)
I have written a detailed post about this Group keys in the below link, you can have a look at the below link.
The Group Temporal Key (GTK) used in the network may need to be updated due to the expiration of a preset timer. When a device leaves the network, the GTK also needs to be updated. This is to prevent the device from receiving any more multicast or broadcast messages from the AP with the older GTK.
To handle the updating, 802.11i defines a Group Key Handshake that consists of a two-way handshake:
- The AP sends the new GTK to each STA in the network. The GTK is encrypted using the KEK assigned to that STA, and protects the data from tampering, by use of a MIC.
- The STA acknowledges the new GTK and replies to the AP.
Observe the below flow about the group key handshake.
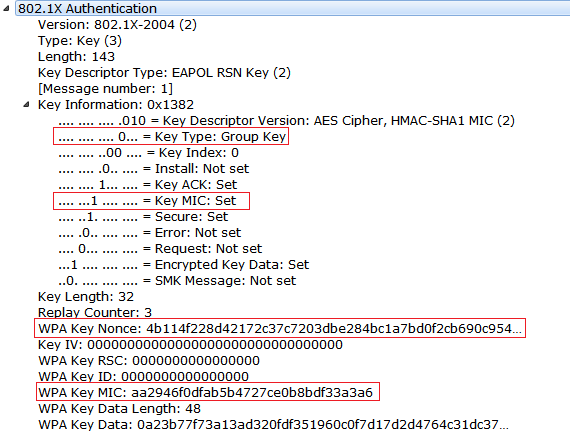
Here also the generation of the MIC is similar to the one we saw in the 4-way handshake MIC will get generated using KCK. we use HMAC-SHA1 will be used to generate the MIC. Observe the below sniffer capture to check the 2-way group key update.
I have set the settings to send the group key to every 30 seconds, and observe the below capture that Group Messages are going for every 30 seconds. Observe the timestamp in the below capture. I have filtered only the required messages.

Check the M1 Message from the Group Key Hand Shake.
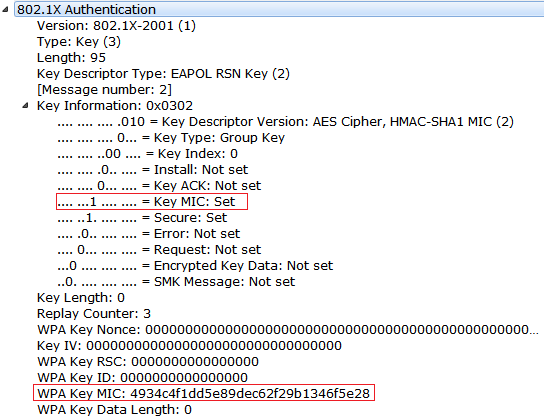
Below is the M2 Message from the Group Key hand Shake.
GTK Generation
We need a GMK and Gnonce to generate the GTK, and below is the function that will generate the GTK.
GTK = PRF-256(GMK, “Group key expansion”, MAC_AP||GNonce)
We have a test template that Standard gives to check whether the generated GTK is calculated as per the standard. Observe the below screen from the test data.

Now we will send the Randomly generated 256 bit GMK and AA (Authenticator MAC) and Gnonce. Now we will execute the python script and check the GTK that the file has generated.

We will take the first 16 bytes of the Generated Hash and it is the GTK. The output that got generated matched with the above table. This GTK will be sent to the Supplicant by encrypting with the KEK in the M3 Message.
Decrypt data using Wireshark
We can decrypt the data using the wireshark , but we should capture the 4-way handshake first , in the wireshark and then you can see the decrypted data.
We can do this by two ways.
- By entering the passphrase:SSID combination in the wireshark.
- By entering the genearted PSK in the wireshark.
Enter the passphrase:SSID combination.
- Open Wireshark , Goto Edit –> Preferences –> Protocol –> IEEE802.11 and then click the edit.

Here we have options to decrypt the traffic.

Now we select the wpa-pwd combination and we enter the value as “passphrase:SSID” format. check the below screenshot.

Or We can enter the PSK that is generated prior to the 4-way handshake.

We can do any of the ways to decrypt the trafiic and observe the traffic that is getting decrypted after giving the details on the wireshark.

Observe the M3 Message in the wireshark, GTK , KEK and KCK values that got decrypted in the wireshark, and compare the results that we saw earlier in the post to verify the KEK And KCK values. It matches.

